Actualités · 15 April 2026
The science of the landing in pétanque: Analysing the ground impact to point better
The landing point30°
optimal angle
of attack at ground contact for a controlled landing on standard terrain
0.4
coefficient
typical coefficient of restitution of a boule on compacted earth
30–60cm
landing distance
in front of the jack for a well-played boule at 7 metres
3
variables
angle · speed · terrain — together they fully determine the landing
What exactly is the landing point?
The term landing point in pétanque refers to the boule's first contact with the ground after its flight. It is a precise technical term — not where the boule comes to rest, not the rolling area, but the initial impact. In some regions of southern France, you may also hear "land on..." to say that a boule made impact at a particular spot.
📐 ANATOMY OF A TRAJECTORY — LANDING AND ROLL
← Flight (parabolic trajectory)
Too short
Ideal landing point
Too long
● Jack
Landing too short → boule stops before the jack
Ideal landing → rolls to the jack
Landing too long → boule runs past
Target jack
The key thing to understand is this: the landing and the roll are two distinct physical phenomena that obey different laws. The landing depends on the flight trajectory (angle and speed) and the terrain's properties (hardness and absorption). The roll depends on the residual speed after impact, ground friction and the boule's spin. Working on them separately allows you to correct them separately.
🎙️ Paquita on the landing point
"Most pointers work on their results. They see that the boule stopped too far away, so they adjust their force. That is not enough. Force is one variable — but the angle of attack and landing point are two other, independent variables. A boule that lands too hard at 45° and one that lands softly at 20° can stop in the same place for completely different reasons. If you do not know which of the three variables was wrong, you correct the wrong thing and keep missing."
— Paquita
The physics of impact — angle, speed, bounce
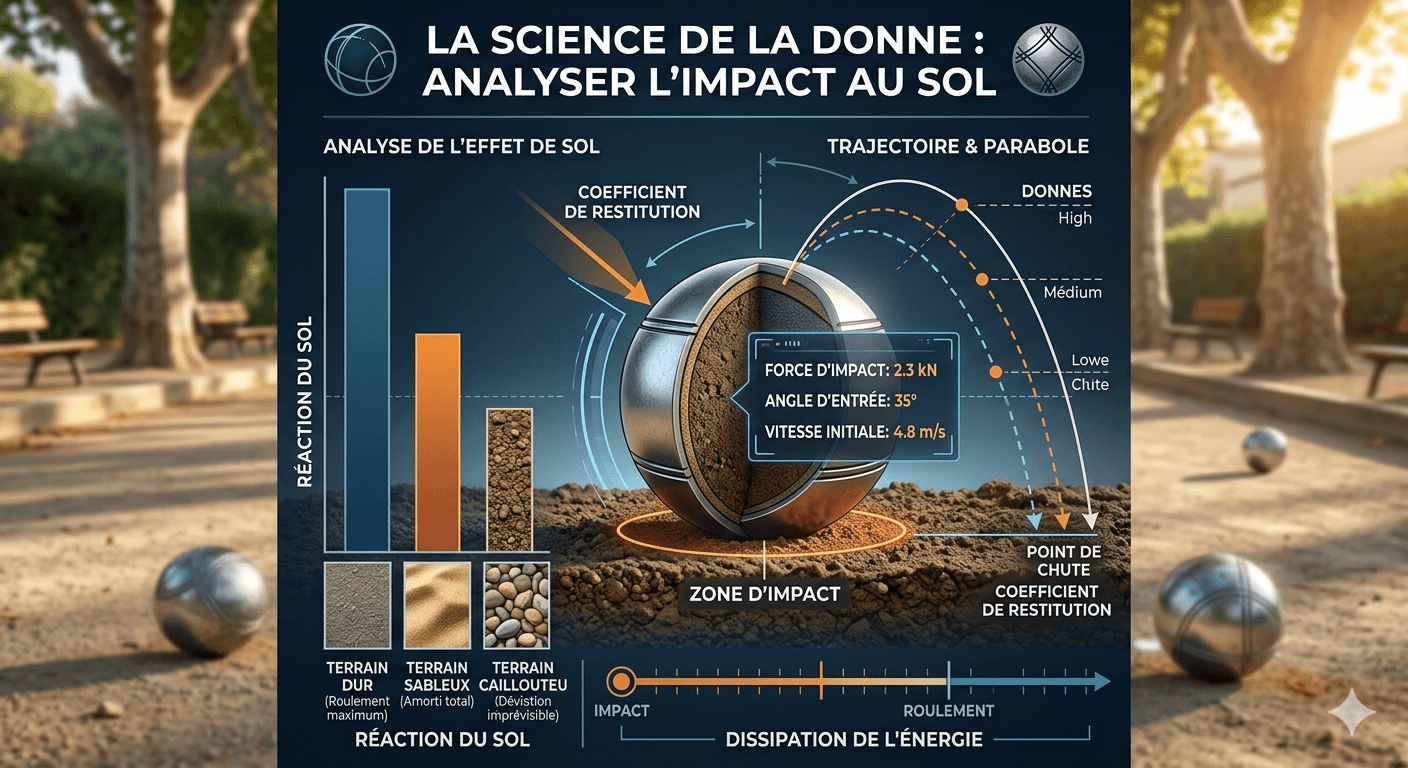
At the moment of impact, three physical phenomena occur simultaneously: compression of the surface, partial alteration of the boule's trajectory, and a transfer of energy between the boule and the ground. These phenomena are described by impact physics and make it possible — to some extent — to predict where the boule will finish.
📐
Angle of incidence
The angle at which the boule reaches the ground. A shallow angle (a flat, almost horizontal trajectory) produces a "glancing" impact — the boule bounces very little and continues to roll. A steep angle (a high, almost vertical trajectory) produces a "driving" impact — the boule bounces more or digs in, depending on the terrain.
θ = angle between the trajectory and the horizontal
⚡
Impact speed
The boule's speed when it makes contact with the ground. It determines the impact's total energy and therefore the distance travelled afterwards. The greater the speed, the more pronounced the bounce and the longer the roll — at a constant angle.
V = speed · cos(θ) horizontal + V · sin(θ) vertical
🔄
Coefficient of restitution
Measures the proportion of kinetic energy retained after impact. A coefficient of 1 = a perfect bounce (hard surface, with the boule rebounding as much as it came down). A coefficient of 0 = total absorption (soft surface, with the boule stopping on the spot). Compacted earth is around 0.3 to 0.5, depending on its condition.
e = V_out / V_in (vertical)
🌀
Boule spin
The boule reaches the ground with spin (backspin for a backspinning shot, topspin for a natural point). This spin interacts with ground friction at the moment of impact and changes the direction and speed of the post-impact roll.
ω = angular velocity at the point of impact
🧮
These formulas do not need to be calculated consciously on the terrain. They are there to explain why why certain parameters have the effects they do. A pointer who intuitively understands impact physics instinctively makes better decisions — they know that on soft terrain they need to land the boule harder and that on an uphill slope they need to land it shorter, without having to calculate.
The angle of attack — the most important parameter
Of all the variables that influence the landing point, the angle of attack is the one the pointer controls best — and the one most often overlooked. It is directly determined by the height of the throw (the height at which the boule is released) and the range of the arm swing.
10–20°
Shallow angle
The boule arrives almost horizontally. It "skims" along the ground with little bounce. The roll is long and difficult to control. Typical of throws that are too flat or too low.
Excessive roll
25–45°
Optimal angle ⭐
The standard angle of attack for most distances and playing surfaces. The boule absorbs some of the energy on impact and rolls a predictable, controllable distance.
Controlled landing
50–70°
Steep angle
The boule comes down almost vertically. On a hard surface, it bounces sharply and may travel a long way. On soft ground, it digs in. This is typical of very high throws or certain styles of high pointing.
Unpredictable bounce
📏
How to vary the angle without changing the throw
The angle of attack is mainly controlled by the release height — not by power. The higher you release the boule (with your hand high at the moment of release), the higher its trajectory and the steeper its angle of attack. The lower you release it (low hand, skimming throw), the flatter the trajectory and the shallower the angle. That is why the same throw with the same force can produce radically different results depending on the release height. On sandy ground that absorbs steep impacts, lowering the release is the first adjustment to make.
How the terrain alters the impact
The playing surface is the landing's silent partner. The same throw will produce radically different results on two terrains with different characteristics. An expert pointer reads the terrain before the first end and adjusts the angle and landing distance accordingly.
TYPE OF PLAYING SURFACE
EFFECT ON IMPACT
LANDING ADJUSTMENT
🟤 Hard, compacted earth
High coefficient of restitution (0.45–0.55). Clean, predictable bounce. The boule grips the surface well after impact.
Standard landing: 30–40° angle, landing 40–60 cm in front of the jack. The most predictable surface.
🟡 Fine sand or fine gravel
Low coefficient (0.2–0.3). The surface absorbs the impact. Little or no bounce — the boule sinks into the ground.
Low, skimming landing: reduce the angle and land closer to the jack (20–30 cm). Increase the speed slightly to compensate for absorption.
🔵 Damp ground / after rain
The coefficient varies with the level of saturation. The surface is softer than when dry — greater absorption and less bounce. The boule may leave a visible mark.
Closer landing: aim 20–35 cm in front. The boule will roll less after impact. Test it during the first few ends.
⚪ Concrete / synthetic surface
Very high coefficient (0.6–0.75). Strong, unpredictable bounce — the boule may travel a long way after impact, especially at a steep angle.
Very low, skimming landing: use the shallowest possible angle and land well in front (60–100 cm). Reduce the speed. Avoid steep angles.
🟢 Short grass / lawn
High friction, reduced bounce. The grass absorbs some of the energy. The boule slows down quickly after impact.
Direct landing: land close to the jack, as the boule will not roll far. Increase the speed compared with a standard surface.
⛰️ Uphill terrain
The effective angle of attack is reduced by the slope. The boule hits the sloping surface with less force. Its roll slows after impact.
Longer landing: aim farther in front of the jack to compensate for the slowdown on the slope. Increase the release speed.
⛰️ Downhill terrain
The effective angle of attack is increased. The boule bounces harder. It gathers speed as it rolls after impact — with a high risk of running well past the jack.
Much shorter landing: land a long way in front and reduce the speed. This is the hardest terrain to calibrate.
Reading the mark — what the imprint reveals about the throw
🔍 ANALYSING MARKS ON THE GROUND
Every impact leaves a mark — learn how to read it
On earth terrains (the vast majority of pétanque grounds), the boule leaves a visible mark at the point of impact. This mark is a wealth of information about the quality of the throw — far more precise than simply noting that it is long or short. Analysing this mark after every throw is one of the most rewarding skills a pointer can develop.
🔵
Clean, round mark
Clean impact, optimal angle. The boule struck the terrain squarely. Speed and angle were well matched. This is the ideal mark.
➡️
Elongated skid mark
The angle was too shallow — the boule skidded across the ground instead of landing cleanly. Raise the release to increase the angle.
⬇️
Deep mark, visible hole
The angle was too steep or the speed excessive. The boule dug into the ground. Lower the release or reduce the force.
↗️
Mark offset to one side
The boule deflected on impact — either because of sidespin as it left the hand or because the ground was uneven beneath the point of impact. Check the line of your arm swing.
🔲
No visible mark
The surface is too hard (concrete or synthetic) or the angle too shallow. The boule did not grip the ground. It cannot be analysed — use a different reference point.
🌊
Double mark (bounce)
The boule bounced before touching the ground again. The angle was too steep for a hard surface. Reduce the angle or choose a landing spot farther away.
Correcting your landing — diagnosis and adjustment
You do not correct a landing by simply throwing a little harder or a little softer. You do it by identifying which variable was wrong and adjusting it precisely.
⬅️ LANDING TOO SHORT — the boule stops short
⚡ Increase the speed of the throw (the most common cause)
📐 Reduce the angle (lower release = flatter trajectory = less energy absorbed on impact)
📍 Aim for a landing spot farther in front of the jack
🌍 On sandy ground: the first two adjustments must be made together
🕐 Late in a competition (fatigue): power decreases — compensate by aiming farther
➡️ LANDING TOO LONG — the boule runs past
⚡ Reduce the speed of the throw
📐 Increase the angle (higher release = more energy absorbed on impact)
📍 Aim for a landing spot closer to the jack
🌍 On concrete or synthetic surfaces: greatly reduce the angle — these surfaces produce a strong bounce
⛰️ On a downhill slope: aim much shorter than your instincts suggest
🎯
The one-third rule: on a standard terrain, the ideal landing spot is about one-third of the total distance from the circle to the jack. For a 7-metre end, the landing spot is approximately 2.3 metres before the jack — or 4.7 metres from the circle. This reference varies with the angle and the terrain, but it is a solid starting point for calibrating your first end on an unfamiliar surface.
3 drills to master your landing point
01
Marker landing drill — aim for the point of impact, not the jack
📍 Earth terrain
⏱️ 15 min
📐 Point-of-impact accuracy
The aim is to separate the landing completely from the final stopping point — focusing solely on the point of impact and consciously ignoring the jack throughout the drill.
Place a small but visible object (cork, lid or coin) on your target landing spot — between 40 and 60 cm in front of the jack, depending on your usual playing distance.
Throw while aiming only at this object. The jack no longer exists. The aim is for the boule to hit the object or land within a 10 cm radius of it. It does not matter where the boule stops afterwards.
Calculate the success rate over 20 throws. Target: 70% within the 10 cm radius. Once you achieve this, move the target object to different distances to calibrate several landing spots.
Gradually, remove the object and throw while mentally visualising the landing spot on the ground. The accuracy developed with the visible object carries over to throws without a physical marker.
02
Variable-angle landing drill — finding the right height for each terrain
📍 Various terrains
⏱️ 20 min
📐 Angle/terrain calibration
Using the same landing spot, deliberately vary the release height to observe the effect on the final distance. This drill makes the relationship between angle and result tangible.
Choose a fixed distance (e.g. 7 metres) and a fixed landing point (40 cm in front of the jack). Mark this landing point on the ground.
Series 1 — low release: Throw 5 boules releasing very low (hand at knee height). Observe where the boules come to rest. Mark their average position.
Series 2 — normal release: 5 boules at your usual height. Mark the average position.
Series 3 — high release: 5 boules releasing high (hand at hip height at the moment of release). Mark the average position. Compare the three groups — the difference in final position directly illustrates the effect of the angle of attack.
03
Systematic mark reading — analyse after each throw
📍 Packed-earth terrain
⏱️ 15 min
📐 Real-time diagnosis
Turn mark reading into a post-throw reflex. After each boule, before even looking at where it came to rest, walk to the mark and analyse it.
After each throw, walk to the impact mark before looking at the final position of the boule. Identify the shape of the mark: round and clean / elongated / deep / offset.
Note out loud (alone or with a partner) what the mark is telling you: "angle too steep", "angle correct", "slight offset to the left"... This verbalisation forces a conscious analysis.
Compare your diagnosis of the mark with the final position of the boule. Check that your interpretation is consistent with the result — if not, revisit your mark reading.
After 20 throws analysed in this way, you start to predict the final position from the impact mark alone — before even seeing where the boule came to rest. That is the proof the skill is ingrained.
The key points to remember
- 🎯The landing is the initial impact — not where the boule comes to rest. Controlling it means controlling an event in flight, not after landing.
- 📐The angle of attack is the main parameter — it is controlled by the release height. The higher the release, the steeper the angle and the more absorbing the impact.
- 🌍The terrain radically alters the landing — hard ground bounces strongly (reduce angle and speed), soft ground absorbs (reduce angle, increase speed). Test this in the first ends.
- 🔍Reading the mark after each throw gives more information than looking only at the final position. The mark reveals the angle, the speed and the axis of the impact.
- 📏The target landing point lies about one third of the way between circle and jack on a standard terrain — i.e. 30 to 60 cm in front of the jack for a 7-metre game.
- 🔄Separate the corrections : if the boule is too short, first identify whether it is a lack of angle, of speed or a poor placement of the landing point. Correct one variable at a time.
📖
PAQUITA’S BOOK
Complete pointing technique and biomechanics
The landing, the angle of attack, adapting to the terrain... Paquita's book covers the whole technique with 100 numbered exercises, level-based programmes and video analysis protocols.
FAQ — Your frequent questions
Should you use a different landing for the lobbed point and the rolled point?
+
Yes, fundamentally. The rolled point has a very low angle of attack (10–20°) — the boule arrives almost horizontally, skims the ground and rolls directly. The landing point is very close to the circle and the boule covers most of the distance by rolling. Suited to hard, regular terrains. The lobbed point has a higher angle (25–45°) — the boule is thrown in a more pronounced arc, lands halfway and rolls to the target. Suited to varied terrains and lets you "go over" irregularities in the terrain. The half-lob is between the two. Each technique involves a different landing calculation.
How do you find your ideal landing point on a new terrain?
+
The most effective method: during the warm-up or the first ends, deliberately throw with slightly different angles and speeds while observing the marks and the final positions. Quickly identify the terrain's "behaviour" — does it bounce strongly? does it absorb? does the boule slide? Once you have two or three data points on the terrain's behaviour, you can extrapolate the ideal landing point. Allow 3 to 4 test games on a completely new terrain to get stable reference points.
Why do my boules always land in the same spot even when I change the angle?
+
If you feel your landing point isn't changing despite your adjustments to the throw, there are two common explanations. First: you think you are changing the angle but in reality your release height stays constant — it is an ingrained gesture that you don't modify as much as you think. Solution: film from the side to see the release height objectively. Second: your force correction unintentionally compensates for your angle correction — when you raise the release, you also throw less hard without meaning to, which keeps the landing point the same. Solution: consciously separate the two parameters during training.
Does rain really change the landing that much?
+
Yes, significantly and often underestimated. A terrain that absorbs 2x more energy on impact (waterlogged terrain vs dry terrain) requires a correction of about 15 to 25% of the throwing speed to maintain the same final distance — depending on the type of terrain and the degree of moisture. The boule sinks deeper into wet ground and loses more energy on impact. The mark left is deeper and wider. Good pointers immediately change their landing reference points when the weather conditions change — it is a tactical adaptation just as important as the technical adaptation.
📎 Related articles
Equipment
Choosing your boules — grooving and behavior on impact
Equipment
Stainless steel vs carbon — difference in behaviour on the ground
Rules
The one-minute rule — managing your analysis between shots
Video
Refereeing videos — game situations with commentary
Equipment
Top 3 best shooter boules 2026
Tools
Free PétanqueLand tools
© Pétanque by Paquita — petanqueland.fr ·
📖 Paquita's book on Amazon
The coefficient and angle values given in this article are practical approximations derived from field observation. They vary according to the boules, the terrains and the conditions — use them as reference points, not as absolute truths.